Nicola Handmade Music
Search This Blog
Sunday, February 5, 2012
Ukelele gourd build pics
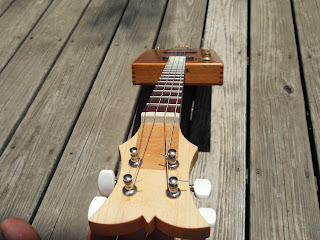
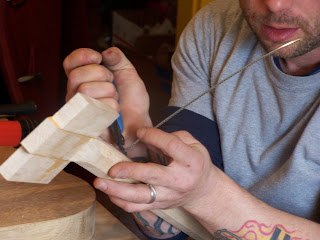
Here are some random build pics of my first ukelele gourd. as you can see i slit the gourd lengthwise and cleaned it out with a curved scraper. the i hand shaped a maple spine that runs the length of the instrument and glues to the inside curve of the neck for support but dropped the spine down in the bowl area as to not interfere with the soundboard movement. the spine runs all the way to the back and glues to the kerfing that i made to run around the inside rim of the bowl for structural support. Also you will notice that I hand carved the headstock from some scrap wood that i laminated together (maple and black walnut) and drilled and tapered some holes for the violin pegs. The fretboard is ebony, the soundboard is cedar and has vee shaped bracing that cross directly under the bridge. There is much work still to be done but I have hit a few snags with regards to shop space. I am currently looking for a studio with which to make more of these. This is only the first one of hopefully many more. This year I grew around 25 more but after using natural curing methods (meaning I dried them outside in all conditions to cause the waterproof skin to rot off exposing the beautiful tan underlayer) a few of them fell victim to the extremes of drying outside and i probably have about 20 usable gourds left. you can see them in a couple of the pics hanging on my deck. You'll notice the nasty black mold on them, this is a good thing. this mold helps remove the waterproof skin that covers the gourd and does not penetrate the visible tan hurd that is underneath. I'll post more pics when i finish. It might be a while.
Ukelele made from organically grown speckled swan gourd
Two years ago I planted a couple speckled swan gourds around my chicken fencing. It seems the gourds really love the nutritious soil produced from years of decaying chicken poop and they grew to enormous proportions. normally these types of gourds are around 2/3 of the size that they reached in my garden. I decided to try and make a ukelele using one of them. above are pics of the fresh gourds. the one on the vine is less than half its final size which is seen in the other pic and stands about two feet tall. After having some success with my first incomplete build I decided that this is what i really want to do, so this year I built a 25 foot long archway using 20 foot re-bar and grew the gourds up and over the trellis causing the emerging gourds to cover and hang down into the tunnel. this is essential for ensuring that the gourds grow nice and straight in the neck area so i can use the actual gourd neck for the ukelele neck. normally these would be grown on the ground causing the neck to bend over and look like a swan, hence the name Speckled Swan. here are a few picks of the garden trellis/tunnel, they are not the greatest pics and these pics were taken when the gourds were still adolescents but you'll get the idea.
neils cohiba electric
here are a couple pics of the finished Cohiba guitar. It features a single electric pickup with massive tone. One volume and one tone pot. I was lazy about taking pics of the rest of the build after the neck building tutorials so I'll try to be better about blogging in the future.
Saturday, March 5, 2011
Making a four string neck part 5 (pressing the frets)
Once i sanded my fretboards how i like them I pressed and trimmed the frets
The pictures tell the story. I used to hammer them but that was a pain in the ass so I made this press. and Also made a few blocks and shims so I can press all the frets up to the high end.notice how I turned my kitchen table into my workshop. this makes my wife so happy.....not.
dig the blurry pics.
I use a pair of flush cut nippers to trim the ends close so i don't have to file so much.
Brick chisel. I layed about a million bricks in the front of my house with this in it's first life.
Making a four string neck part 4 (beveling the neck)
After I cut the frets I am ready to bevel the back sides of the neck on the bandsaw following some guide lines. the neck in cross section will look like the picture below.

now that I beveled the back the neck will sit nicely in the vee blocks on the fret press. but first I glue on the ears so we have enough wood to make the shape headstock I want. you can put them however you want for the shape you need. I put wax paper wherever the glue will squeeze out and don't worry about over seepage, I can just sand that right down with the palm sander. The ears also strengthen the first (center) joint.
Quick clamps are the bomb.
Friday, March 4, 2011
Making a four string guitar neck part 3 (marking and slotting the frets)
Fret press
I made this fret press and thought I would share it before I finish the neck making posts. I need to fret three necks so I broke down and made this press. It features 2 inch thich quarter sawn white oak. The whole unit is 21" long by 7-1/2 wide and weighs about forty pounds or more. I used a brick chisel for the press head. first I flattened and shaped the face of the chisel to accept the groove and then I ran a zip wheel over the face to get a groove to guide my file and finished the face with a small round file. The handle is I think from a snowblower or something. I said to myself, "one day I'll use those", and low and behold I used one.
The rest is just drilling and shaping and bolting. not as easy as it sounds. for now I use vee blucks to hold the necks since the necks come off the bandsaw with a perfect beveled back, but I can easily make a block to hold fully shaped necks. It works like a charm and is much easier than hammering frets. You do still have to hammer in some of the higher frets though.
Subscribe to:
Comments (Atom)


